Lethe PHP Newsletter & Mailing System is a full-featured newsletter PHP based script which fulfils all subscribers, emails, marketing and newsletter related needs for both personal and business environments.
Lethe PHP Newsletter & Mailing System is a full-featured newsletter PHP based script which fulfils all subscribers, emails, marketing and newsletter related needs for both personal and business environments.
It has robust, efficient and unique features! This is an all-in-one newsletter tool for your site can be configured to behave as desired and it will provide the best experience for your email subscribers at the same time.
Lethe works the way you do so you can focus on creating newsletters and giving your website the necessary exposure!
2.2 Migration and Changelog
2.1 to 2.2 Migration For Older Buyers
IMPORTANT: Get backup for below files
/lib/lethe.sets.php and /lib/lethe.config.php
Please upload all files inside of updated_files_for_2_2.rar to your installed Lethe root After reload backup files.
Go to General Settings / Update Section and click latest changes link (It will create new table columns and indexes or fixes)
Note: If you want use our bounce rules you can import lethe_bounce_rules.sql file in your lethe database.
Installation DB NULL error fixed
License verification server has been changed
Some PHP7 issues fixed - System tested on (PHP 5.4~5.6 and PHP 7.0~7.3)
Send Now feature has been changed
Password recovery system has been changed (Default system will use mail() function, please check FAQ section for detailed informations)
Password recovery template added
System Submission account changed SMTP to PHPMail for first installation
Swiftmail settings has been changed
Verification system has been changed
New bounce rules added
New Feature: Bounce rule manager added
Incoming Mail Setting Fields removed if you disable Bounce or imap_open() function not enabled on your server.
Newsletter and Autoresponder List and Stat Calculation System Has Been Changed
Organization Setting Section Merged With General Settings
Database Table Creation System Changed to Import SQL file method
Installation File Has Been Changed, Requirement List / Controllers Modified
New Language Keys Added
Autoresponder After Subscription Action Modified
Chrome Date Input Field Issue Fixed
shell_exec and crontab Command Editor Added
Subscribing Form Section and Embed Code Generator Changed
Group Choicer Field Added on Subscribing Forms
Same E-Mails Can Be Added on Different Groups
Amazon SES System Has Been Changed, Region Choicer / Port Available Now
New Bounce Rules Added
Bounce Controller Enable / Disable Option Added
Verification Mails Added on API Subscription
Auto Track Link Controller Added
Remote Update System Added (Requires License Code for Downloads)
Jquery Countdown system changed. Older version was used browser time.
Manual submission account resetter option added.
Subscriber Tags Added (for Mr, Mrs, Sir, Madam)
CSV Analyser Subscriber Tag, Country, Country Code, City, Region, Region Code Options Added
Subscriber Tag (Name Prefix) Field Added on Subscribing Forms
Subscriber Tag (Name Prefix) Short Code Added
Requirements
Required
PHP Version 5.4+
MySQLi Extension
Script Timeout allowed to change
Curl Extension
fopen Extension
mb_substr() Extension
Shell Access
Writable Folders
/lethe/resources
/lethe/lib/lethe.config.php
/lethe/lib/lethe.sets.php
IMAP Open
Recommended
Script Execute Time (0)
Upload Limit 10MB+
Post Max Size 10MB+
PHP Mail() function
fgetcsv() function
Recommended settings is not required, Lethe will work as your system settings. But if you want to import large amount datas, your system may block your actions and its will not work properly.
Features
General
Easy Installation
SMTP / PHPMail / GMail Support / Amazon SES / MandrillApp / SendGrid
Upload all files to your web server directory and run install.php file via browser.
For Subdomains;
http://lethe.example.com/install.php
For Lethe Directory;
http://www.example.com/lethe/install.php
Lethe requires PHP 5.4+ if you cannot continue to installation, you may get an error about PHP version. Please check FAQ section for PHP version.
STEP 1 : Requirements;
Lethe system requirement list. All options must be green check. Recommended list is not important for stable works if its not meet your system settings. But if you want to use large amount projects these options must be changable.
STEP 2 : Database Settings;
Your Lethe database connection settings. If you do not know what is database or how to find these connection settings, you can contact with your hosting service provider or you can check their knowledgebase for DB creation and connection.
Database Host: Your Lethe database host or IP address. Database Name: Your Lethe database name. Database Login: Database login name. Database Password: Database login password.
Click on Test Connection button. It must be turn green button for successfully connection.
IMPORTANT: Automatically table creation system was disabled on Lethe v2.1. You should be upload .sql file via phpMyAdmin beafore installation. You can find .sql file in your downloaded zip file.
STEP 3 : System Settings;
General settings for Lethe system.
Default Language: Lethe, system default language. This setting will use by new organization creation and undefined language selections.
Default Timezone: If your local time different from your hosting, you can set time with your local time. Default timezone can changed by organization.
Default Theme: System default workbench layout. This setting will use on new organization or undefined theme selections. You can test layout views with listbox.
Lethe URL: Your Lethe location URL. This field will generate of your URL automatically. If generated URL incorrect with your URL or if you want to use IP for that you can change default settings.
Lethe Admin URL: Your Lethe Admin location URL. This field will generate of your URL automatically. If generated URL incorrect with your URL or if you want to use IP for that you can change default settings.
Save Tree On: Its a simple e-mail signature about public advice. When option turn on, SAVE_TREE short code will added on short codes list.
Google reCaptcha Keys: You can use your own reCaptcha API keys. Current system using our Google reCaptcha keys, we can not guarantee 100% that would be constantly active. If you have Google reCaptcha service, please use your generated keys. Google reCaptcha
License Key: Lethe Script License key. Key generated by Envato when you purchase item.
STEP 4 : Submission Account;
Submission account will be created automatically for first installation. You can modify settings after logged in Lethe panel.
STEP 5 : Organization Settings;
Lethe allow to use multiple organizations and its could be work as a SaaS software. But current system (Lethe Lite) does not allow to use multi-organiation registrations. Its just work single organization.
Organization Name: Main project or account identity.
Organization Sender Title: E-mail sender title for organization. (aka.From Title)
Reply E-Mail Address: When a subscriber reply your mails, this e-mail address will use as receiver e-mail address.
Test E-Mail Address: When you send a test newsletter, this address will use for receiver e-mail and you can test newsletter contents before send campaigns.
After Unsubscribe: Rule for unsubscription actions.
Subscription Verification Methods: When a guest add a e-mail address to your list, system will send a verification mail for guest's e-mail.
Random Loader: System will choose random subscribers from your task list.
Task List Loading Method: System will choose subscribers as your selected loading method.
STEP 6 : Administration;
Your Super Admin registration, this user cannot be deleted or changed as a normal user.
Admin Name: User display name. Admin E-Mail: E-mail will be use as system logins and password reminder actions. Admin Password: User login password
NOTE: If you lose password after installation, please check Advanced Modifications section.
STEP 7 : Complete;
Click on Install Now button. If all inputs meet with validations your installation successfully completed then.
Dashboard
You can see all active events and reports from the dashboard.
Status Widget
Pending - X campaign(s) on pending status
In Process - X campaign(s) still sending your mails.
Stopped - X campaign(s) stopped
Completed - X campaign(s) tasks completed, all mails send successfully
Subscribing Widget
Monthly verified subscriber graph.
General Statistics
Opens - Opened mail statistics (Global stats)
Clicks - Clicked link stats (tracker_link counter for global campaigns)
Bounces - Bounced mail stats (Global stats)
Unsubscribes - Unsubscribing counter (Based global Unsubscriber table not Unsubscribe group count)
E-Mail Marketing Score
Global campaign Productivity analysis, values are calculated based on all campaigns. Please check Reports section for detailed informations.
Recent Newsletters
Pending / In Process status campaign list. (Max 5 record)
Active Autoresponders
Currently active autoresponder records. (Max 5 record, listed by launch date)
Organization Resource Usage
Active organization resource usage counts. (informational purposes only, detailed stats active on Lethe PRO)
Precious Subscribers
Active subscribers. List created by subscriber's opened and clicked link stats. That's mean; top subscribers is follow-up of all your campaigns.
New Templates
Free template feed. Please check Templates section for detailed informations.
Administrations
Lethe can managed with multi-user accounts. There 3 administration level available.
Super Admin
It has all the authority of management. Also new organizations could be created by Super Admin and limit manager (Only for Lethe PRO).
Admin (Only for Lethe PRO)
Organization manager, its has all the authority of organization. Organization users could be created by Admin.
User
Lethe user. Its can only create campaigns by user's own limits.
Submission Accounts
Sending & mailbox settings. Submission accounts can defined to organizations for mail sending actions, also bounces could be controlled by suvmission account settings.
General Settings
Submission account general settings.
Account Title
It will determine the identity of the submission account. Its just information about submission account, this information will not use for sending actions.
Limit Range
Sending limits range for your entered limit value.
If your e-mail service provider offers limit for mail sending interval, you can choose a range on list.
For example; Your service provider may have set 200 mail per hour sending limit.
Limits
Maximum number of send emails for account. Gray box on the right shows the current sent count.
For example;
Limit Range: Hour
Limit: 2000
Lethe will send 2000 mail per hour.
IMPORTANT: Please use your mail server's limit. You may receive warning messages when you reach that limit.
Send Per Connection
Send mail per connection.
This option required for system performance.
For example;
Newsletter #1
- Selected Subscriber Count : 100 - Send Per Connection Limit : 20 - Standby Time : 1 second
Sending Action:
1 - Load Newsletter #1 2 - Catch first 20 subscriber datas 3 - Connect to server 4 - Send Mails & Close server 5 - Stay for 1 second 6 - Repeat for other subscriber lists until 100.
Standby Time (Seconds)
Stand-by time for each sending actions.
This option required for system performance.
For example;
Newsletter #1
- Selected Subscriber Count : 100 - Send Per Connection Limit : 20 - Standby Time : 1 second
Sending Action:
1 - Load Newsletter #1 2 - Catch first 20 subscriber datas 3 - Connect to server 4 - Send Mails & Close server 5 - Stay for 1 second 6 - Repeat for other subscriber lists until 100.
System Account
Main submission account for every email sending actions.
This account will use by;
- Registration verifications (Lethe PRO) - User password recoveries
Debug Mode
This option will shows connection and sending errors.
Active
This option will show or hide your records.
Sending
Default sender mail informations. These informations will use on system mail sending actions like password reminder etc. You must re-type some informations to organizations section. Sender Title, Reply E-Mail and Test E-Mail fields can be changed by organizations.
Sender Title
E-Mail sender name or title.
Sender E-Mail
Mail sender's e-mail address.
IMPORTANT: Sender mail address must be same with SMTP username, if you use SMTP method.
Reply E-Mail
Reply to e-mail address.
When a subscriber reply your mails, this e-mail address will use as receiver e-mail address.
Test E-Mail
Test e-mail address. When you send a test newsletter, this address will use for receiver e-mail and you can test newsletter contents before send campaigns.
IMPORTANT: Test Mail will send test contents. Mail contents will not contain System Short Codes (Newsletter, Unsubscibe, Tracker Links etc).
E-Mail Content Type
E-Mail body type. Text-plain or HTML.
E-Mail Engine
E-Mail sender engine.
Ready-to-use e-mail sender classes. You can use different mail sender classes if you are having problems with selected engine.
Connection
E-Mail sending settings.
Sending Method
SMTP
The most commonly used method of sending.
IMPORTANT: Some hosting service providers block foreign SMTP connections. If you get SMTP connection error while sending mails for example GMail, sevice may be dont allow to use this connection. Please try your own SMTP account before test other SMTP accounts.
SMTP Server: Outgoing e-mail host/IP address. SMTP Port: Outgoing e-mail connection port. E.g: 587 SMTP Username: Outgoing e-mail username (must be same with From E-Mail field). SMTP Password: Outgoing e-mail password. SMTP Encryption: If your e-mail service provider supported secure connections, you can choose security method on list. (dont forget to change port) SMTP Auth: SMTP Authentication, often abbreviated SMTP AUTH, is an extension of the Simple Mail Transfer Protocol whereby an SMTP client may log in using an authentication mechanism chosen among those supported by the SMTP server.
PHP Mail
Simple e-mail sending function. Does not required server connection, you can use that for foreign mail accounts. But is not recommended for server performance for large amount lists.
AWS Region: Your AWS region server AWS SMTP Username: Your created AWS SMTP Username. AWS SMTP Password: Your created AWS SMTP Password. AWS SMTP Port: AWS supported 25, 2525, 587, 465 ports. Default is 587, if your hosting blocked that port you can use other ports.
SendGrid Username: Your SendGrid Username SendGrid Password: Your SendGrid Password
POP3
Mailbox connection settings for POP3
POP3 Server: Incoming e-mail host/IP address. POP3 Port: Incoming e-mail connection port. (e.g: 110) POP3 Username: Incoming e-mail username. POP3 Password: Incoming e-mail password. POP3 Encryption: If your e-mail service provider supported secure connections, you can choose security method on list. (dont forget to change port) Bounce Account: There are two ways to control bounce mails IMAP and POP3. You can choose a mailbox connection method.
IMAP
Mailbox connection settings for IMAP
POP3 Server: Incoming e-mail host/IP address. POP3 Port: Incoming e-mail connection port. (e.g: 143) POP3 Username: Incoming e-mail username. POP3 Password: Incoming e-mail password. POP3 Encryption: If your e-mail service provider supported secure connections, you can choose security method on list. (dont forget to change port) Bounce Account: There are two ways to control bounce mails IMAP and POP3. You can choose a mailbox connection method.
IMPORTANT: Mailbox connections uses imap_open function. Your hosting service must be allow to use this function for bounce mail handling.
DKIM
About DomainKeys Identified Mail (DKIM);
DomainKeys Identified Mail (DKIM) lets an organization take responsibility for a message that is in transit. The organization is a handler of the message, either as its originator or as an intermediary. Their reputation is the basis for evaluating whether to trust the message for further handling, such as delivery. Technically DKIM provides a method for validating a domain name identity that is associated with a message through cryptographic authentication.
IMPORTANT:If you are using the outbound mail services of a mail server that already has DomainKeys installed, you do not need to digitally sign your emails.
Specifically for PHP mail() users: if DomainKeys is enabled and properly setup in your DNS Zone Record, and you use an email address for Return-path, Reply-to, and From that is consistent with the domain, you do not need to digitally sign your emails.
DKIM Active
If you use DKIM feature this option will add DKIM informations into your mail header.
Domain
DNS Record domain name eg. mydomain.com
Private Key
Generated DKIM private key file name. Private key files stored in lethe.keys directory. Please enter only filename on this field.
If you dont want to use bounce controls or if your hosting service does not allow to use imap connection you can disable that feature.
A bounce is matched with "bounce rules". The bounce rule determines what needs to be done the bounce. Typical actions on a bounce would be:
Remove
Force subscriber removing action. Subscriber mail will removed your list except reports.
Remove & Add to Blacklist
Force subscriber removing action. Subscriber mail will removed your list except reports. Also e-mail address will add to your blacklist as "Bounce" reason.
Move to Unsubscribe
E-mail will not remove on your list, but e-mail address will move to your Unsubscribers Group
Bounce Types
Antispam
Mail content has been detected as spam by receiver's mailboxes.
Autoreply
Receiver has been set a autoresponder for received mails.
Concurrent
It appears that the mail servers that were responsible for delivering the message to us were temporarily blocked due to a high number of concurrent connections.
Content Rejected
Your message is being blocked by receiver's mailbox because it either had characteristics similar to "spam".
Command Rejected
The message was sent in a non-conventional, non-standard way.
Internal Error
Receiver's e-mail host not found or temporarily down.
Deferred
Temporary failure at the receiving domain.
Delayed
Temporary failure at the receiving domain.
DNS Loop
Receiver's domain DNS failure.
DNS Unknown
Receiver's domain / host could not be found.
Mailbox Full
Recipient's mailbox is full or has exceeded storage allocation.
Mailbox Inactive
Address is temporarily unavailable as recipient's mailbox is inactive or temporarily disabled.
Only Latin
Receiver does not accept email in non-Western (non-Latin) character sets
Other
Mailbox temporarily unavailable or indecipherable bounce message received.
Oversize
E-mail content size does not accept by receiver's mailbox.
Out of Office
Receiver has been set a autoresponder for received mails.
Unknown
Address is invalid and/or failure is permanent per bounce message.
Bounce handler automatically create when you add new Submission Account. Its uses simple imap_open control and requires POP3/IMAP connection.
Bounce handler, periodicly connect to your POP3/IMAP account and check your mailbox for returned mails.
IMPORTANT: imap_open must be enabled on your server. Some hosting service providers does not allow to connect mailbox via PHP scripts. If you think that the bounce handler does not work properly, please check hosting firewall settings, imap_open access and connection informations.
Bounce Rule Manager (Added on v.2.2)
You can find Bounce Rule Manager feature at General Settings > Submission Accounts > Account > Bounce Tab
Bounce mail controls using RegExp (Regular Expressions) patterns to find returned mail errors.
Its simply works like that;
1 - Cron Will Run Your Bounce Handler File
2 - System Will Try Mailbox Connection
3 - Every Unreaded mails Header / Body will compared with Bounce Rules
4 - If its founded matched mails, it will apply your rule actions like remove mail / blacklist or move actions
Latest update contain 152 bounce rule. You can increase of your rules on Bounce Rule Manager
RegEx Patterns
Regular Expression patterns for incomming bounced mails. These patterns will search specific strings in your bounced mail bodies. (Check Detailed Informations about RegEx Patterns)
Its simple code details in your file. It will shown in your file like that;
/* Error: user not found! */
Category
You can define a category for your rules. Each category using your actions like delete / move
Matches
Its mail matches. If your bounced mails just contains error text and header and no mail address, you can uncheck this option.
Update File
If you click Save button after entered your rule, it just save your rules in your database. You should be click Update File button to write new rules in your Bounce Handler File.
Bounce handler automatically create when you add new Submission Account. Its uses simple imap_open control and requires POP3/IMAP connection.
Bounce handler, periodicly connect to your POP3/IMAP account and check your mailbox for returned mails.
IMPORTANT: imap_open must be enabled on your server. Some hosting service providers does not allow to connect mailbox via PHP scripts. If you think that the bounce handler does not work properly, please check hosting firewall settings, imap_open access and connection informations.
If your imap_open disabled on your server or Bounce Module inactive on your Lethe. POP3/IMAP settings will be disappear on settings.
General Settings
This section contain Lethe system settings. These configurations only can be changed by Super Admin, also settings are defaults for organizations each configurations can be customized by organizations timezone, default language, theme etc.
Default Language
Lethe, system default language. This setting will use by new organization creation and undefined language selections.
Default Timezone
If your local time different from your hosting, you can set time with your local time. Default timezone can changed by organization.
Default Theme
System default workbench layout. This setting will use on new organization or undefined theme selections. You can test layout views with listbox.
Lethe URL
Your Lethe location URL. This field will generate of your URL automatically. If generated URL incorrect with your URL or if you want to use IP for that you can change default settings.
Lethe Admin URL
Your Lethe Admin location URL. This field will generate of your URL automatically. If generated URL incorrect with your URL or if you want to use IP for that you can change default settings.
Save Tree On / Off
Its a simple e-mail signature about public advice. When option turn on, SAVE_TREE short code will added on short codes list.
Save Tree Text
You can change default Save Tree signature with your own styles. HTML tags can be use on that.
Google reCaptcha Keys
You can use your own reCaptcha API keys. Current system using our Google reCaptcha keys, we can not guarantee 100% that would be constantly active. If you have Google reCaptcha service, please use your generated keys.
Lethe Script License key. Key generated by Envato when you purchase item. Verification controller using CURL extension, CURL should be enabled on your system if its not enabled you may be get Invalid License error.
Valid key required for;
Updates
New Template List & Downloads
General Setting Updates
Where the license key?
Debug Mode On / Off
If you have trouble with Lethe and if you think that systemic problems you can turn on debug mode for detecting where the problem occurs.
System Notices
You'll see a news ticker top-left of page. Thats created to make you aware of these innovations and updates. You can turn-off this feature.
Pointips
Pointips is a mini helper such as helper box you click. You can turn-off this feature.
The software utility Cron is a time-based job scheduler in Unix-like computer operating systems. People who set up and maintain software environments use cron to schedule jobs (commands or shell scripts) to run periodically at fixed times, dates, or intervals. It typically automates system maintenance or administration—though its general-purpose nature makes it useful for things like downloading files from the Internet and downloading email at regular intervals. Cron is most suitable for scheduling repetitive tasks. Scheduling one-time tasks is often more easily accomplished using the associated at utility.
Lethe's Cron Cycle
Default Lethe configurations using shell_exec based cron. Previosly version (v1.0) was used single cron file and required manually cronjob creation on hosting panel. New version has shell_exec feature to automatically cronjob creation and delete.
Single file enough for campaign task management but, if you have too many subscribers and campaigs, your tasks will be stuck on submission. Because other campaigns will not start until first task complete. shell_exec will be create campaign based cronjobs with campaign IDs and all campaigns will be sent their own cron execution.
(v.2.1) Has been changed for shell_exec and single task files added. Some hosting services does not allow to use shell_exec for security reasons. You can use single tasks files to manually cronjob creation.
Cron Command
All hosting services using different path for cronjob command. We have listed common commands, you can choose correct command for your hosting service.
Minimum Cron Time
Default system using every minutes for cron execution. But some hosting services has minimum exeution limit like every 15 minute. You can choose correct time on this list.
shell_exec
shell_exec On / Off If your hosting service disabled shell_exec, you should be use single task files.
shell_exec ON
exec type
shell_exec and exec is same functions. Some hosting services disable shell_exec() command but you can use exec()
shell Command
Default system calling crontab via shell_exec like shell_exec('commands crontab'); but some hosting services using different path for it. You can choose correct crontab path on this list.
shell_exec OFF
If you want to disable shell_exec feature. You should be create cronjobs manually on your hosting panel. Below commands is your Lethe task files for single cronjobs.
Organizations
Organizations is part of Lethe's multi-instance system. But Lethe Lite only allow to manage single organization. Multiple organization management only available on Lethe PRO. How it work?
For example;
- Super Admin (Full access and organization creator)
-- Organization (An E-Marketing Company or Client) (Only One Organization For This Version)
---- Admin (Full Access for Organization) (Not available on this version, Super admin manages as a Organization Admin.)
------ User (Organization User, campaign creator, editor. Only allowed access to selected sections)
Settings
General
Organization Name
Your organization or company name. Short codes contain a {ORGANIZATION_NAME} code, its will use this field.
Limits
Resource usage system is possible to use on Lethe PRO version. Lethe Lite version limits setted by Unlimited for created Organization.
Limits can be sold to customers as a package system. (Only PRO Version)
Maximum Disk Quota
Unlimited for Lethe Lite Version
Maximum disk usage limit. (Backup, Template Uploads, Database, Log)
Maximum User
Unlimited for Lethe Lite Version
Maximum user account for each organization.
Maximum Newsletter
Unlimited for Lethe Lite Version
Maximum campaign limit. Users cannot create new campaigns if limit exceeded.
Maximum Autoresponder
Unlimited for Lethe Lite Version
Maximum campaign limit. Users cannot create new auto-responders if limit exceeded.
Maximum Subscriber
Unlimited for Lethe Lite Version
Maximum subscriber limit. Organization cannot add new subscribers if limit exceeded. (Subscribe form, API, Import sections will give subscription stopped error when limit exceeded)
Maximum Subscriber Group
Unlimited for Lethe Lite Version
Maximum subscriber group creation limit. System groups is not included that limit count.
Maximum Subscribe Form
Unlimited for Lethe Lite Version
Maximum subscribe form creation limit.
Maximum Blacklist
Unlimited for Lethe Lite Version
Maximum blacklist record limit. Blacklist controls will pass actions when limit exceeded.
Maximum Template
Unlimited for Lethe Lite Version
Maximum template creation limit. System templates is not included that limit count.
Maximum Short Code
Unlimited for Lethe Lite Version
Maximum custom short code creation limit.
Daily Send Limit
Unlimited for Lethe Lite Version
Organization maximum daily e-mail sending limit. Campaigns will stop when daily limit exceeded. Also primary limits will controls by submission account, thats mean if submission account default daily limit exceeded, organization daily limit will blocked. Unlimited mail sender account best solutions for large organization management.
Organization Standby
Unlimited for Lethe Lite Version
Organization order of importance, primarily organization will use when system overloads.
Settings
Organization general configurations.
Submission Account
E-Mail sender account, server settings can edit by system administration.
Sender Title
Organization default e-mail From Name title.
Reply E-Mail
Reply To e-mail address. This address will used by subscribers when they're send a reply from your letters.
Test E-Mail
Test e-mail address. When you send a test newsletter, this address used for newsletter test view.
Note: Test Mail will send test contents. Mail contents will not contain Unsubscribe Link, Track URLs etc.
After Unsubscribe
When a subscriber click your Unsubscribe Link or if you use add / remove option on your subscribe forms, selected action will use after unsubscription.
Mark it inactive;
When a subscriber click on your Unsubscribe Link, subscriber record will mark as inactive subscriber. This is associated with the subscriber loader portion.
Remove from database;
When a subscriber click on your Unsubscribe Link, subscriber record will removed from your database.
Move to unsubscribe group;
When a subscriber click on your Unsubscribe Link, subscriber record will not removed from database, but its not load to campaign task list anymore, until you move it to another group.
Verification
When a guest add a e-mail address to your list, system will send a verification mail to guest's e-mail.
Off
E-Mail will record to database without verification.
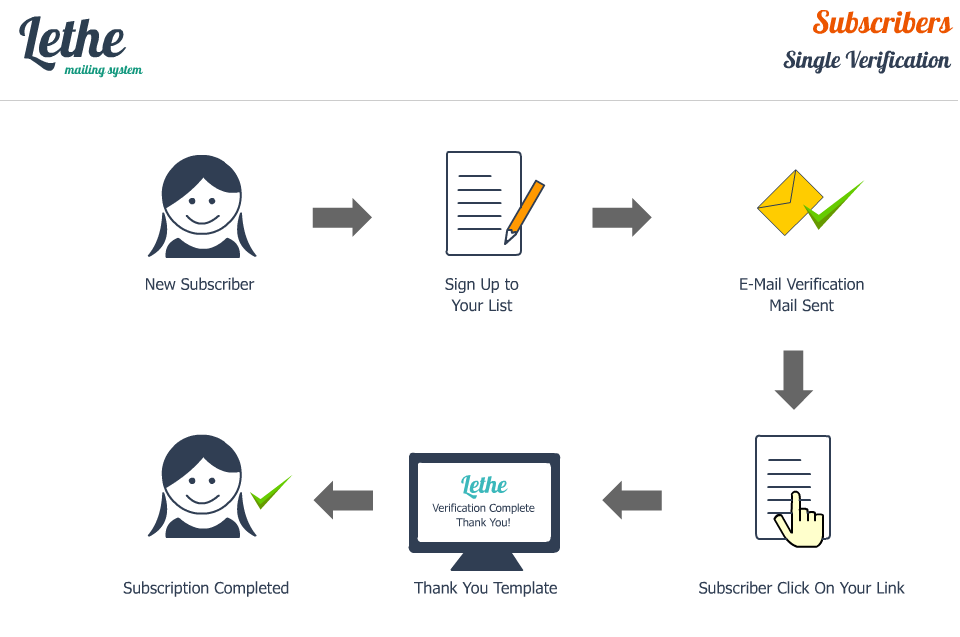
Single-opt-in
E-Mail will record to database but its will marked as inactive. After registration; system will send a verification e-mail to subscriber's e-mail address. If subscriber click on verification link, e-mail record will mark active.
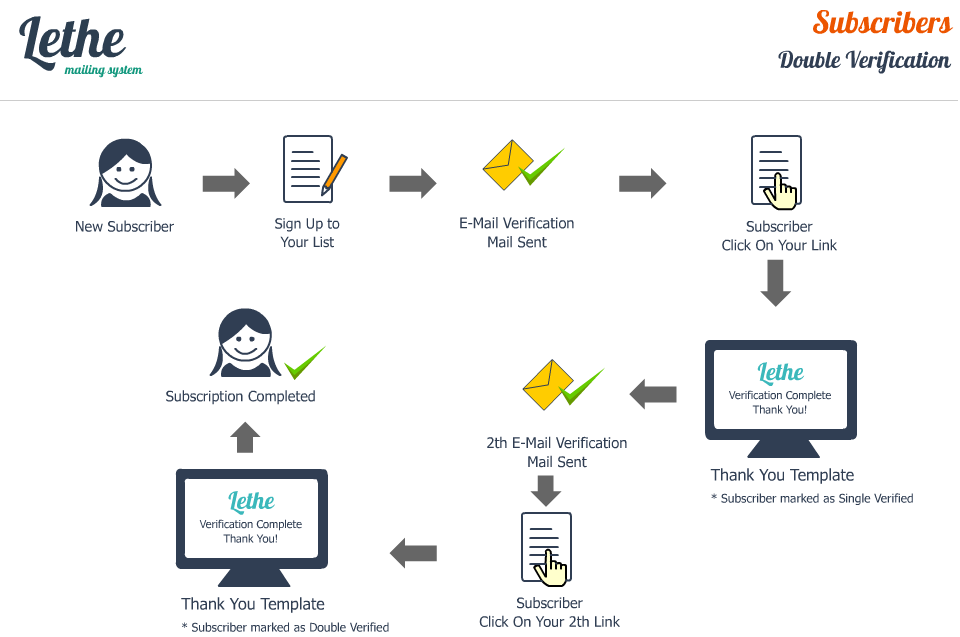
Double-opt-in
E-Mail will record to database but its will marked as inactive. After registration; system will send a verification e-mail to subscriber's e-mail address. If subscriber click on verification link, e-mail record will mark single-active and system will send verification e-mail again. E-mail record will mark as double-active when subscriber click on second verification link.
Random Loader
System will choose random subscribers from your task list.
If you tried too many test campaigns with your real subscriber list or if your system delayed while submission, your subscribers could be get too many flood mails and your mail / domain address could be reported as spammer. This option will choice random subscribers on your database.
Be careful to use this feature, it will be overload your system if you have 500k over subscriber data.
Loading
System will choose subscribers as your selected loading method.
All
All subscribers will load to task list.
Active
Only active subscribers will load to task list.
Active + Single Verified
Only active and single verified subscribers will load to task list. (Except Double Verified)
Active + Single Verified
Only active, single and double verified subscribers will load to task list.
Users
Organization users.
User Name
User's real or display name.
User E-Mail
User's E-mail address. E-Mail will use when user request a new password.
User Password
User's system login password.
Management Type
There two user type available
Admin (Only Lethe PRO)
Full access for organization.
User
Limited access for organization.
Limits
Access pages for user. You can choose which pages users can access.
User Creation and Permissions
Short Codes
You no need to retype the same information in each campaigns. Short Codes will dynamically replace your texts in your letters.
There are two types of short codes available.
1 - System Codes
These code values replaced by system, its cannot be changed or deleted.
{NEWSLETTER_LINK[TEXT]}
Campaign link code. If campaign allowed to view as "web view" This text will replaced by a clickable link.
Usage:
In your newsletter edit area;
If you have trouble with the view this e-mail, please {NEWSLETTER_LINK[click here]}.
In subscriber mailbox;
If you have trouble with the view this e-mail, please click here.
{RSS_LINK[TEXT]}
Organization's active campaign rss feed link. Only active, completed, in progress and web option active campaigns can be listed.
Usage:
In your newsletter edit area;
If you want to follow our campaigns, please {RSS_LINK[click here]}.
In subscriber mailbox;
If you want to follow our campaigns, please click here.
{UNSUBSCRIBE_LINK[TEXT]}
Subscribing cancellation link. Subscribers can click on this link if they're want to leave from your list. Please check Unsubscribing section for detailed informations about unsubscribing.
Usage:
In your newsletter edit area;
If you would like to unsubscribe, please {UNSUBSCRIBE_LINK[click here]}.
In subscriber mailbox;
If you would like to unsubscribe, please click here.
{TRACK_LINK[TEXT][URL]}
If you want to get reports about who click your links in your letters, you must be use track link code for that. Unlike from others, track link has two option [TEXT] and [URL]. [TEXT] is your link title, what you want to see the text for the link. [URL] is your link address.
Usage:
In your newsletter edit area;
Hello {SUBSCRIBER_NAME}! Did you see our latest {TRACK_LINK[products][http://www.example.com/]}?
It will replace this text with your "Organization Name"
Usage:
In your newsletter edit area;
Hello {SUBSCRIBER_NAME}! Welcome to {ORGANIZATION_NAME}!
In subscriber mailbox;
Hello John Doe! Welcome to Lethe!
{SUBSCRIBER_NAME}
Text will replaced by "Subscriber Name" where did you place it. If subscriber name field is empty, short code will return empty text. Use with caution, sometimes may have trouble on spelling. For example;
If subscriber's name field empty;
Hello {SUBSCRIBER_NAME}! => Hello!
Your name {SUBSCRIBER_NAME}! => Your name!
Usage:
In your newsletter edit area;
Hello {SUBSCRIBER_NAME}!
In subscriber mailbox;
Hello John Doe!
{SUBSCRIBER_MAIL}
It will replace this text with "Subscriber's E-Mail Address"
Usage:
In your newsletter edit area;
Hello {SUBSCRIBER_NAME}! Please take a second to confirm {SUBSCRIBER_MAIL} as your email address by clicking this link:
In subscriber mailbox;
Hello John Doe! Please take a second to confirm johndoe@example.com as your email address by clicking this link:
{SUBSCRIBER_WEB}
It will replace this text with "Subscriber's Web Address". It will return empty text if subscriber's web field is empty.
Usage:
In your newsletter edit area;
Hello {SUBSCRIBER_NAME}! Your web address: {SUBSCRIBER_WEB}.
In subscriber mailbox;
Hello John Doe! Your web address: http://www.example.com.
{SUBSCRIBER_PHONE}
It will replace this text with "Subscriber's Phone Number". It will return empty text if subscriber's phone field is empty.
Usage:
In your newsletter edit area;
Hello {SUBSCRIBER_NAME}! Your phone number: {SUBSCRIBER_PHONE}.
In subscriber mailbox;
Hello John Doe! Your phone number: +1-111-111-1111.
{SUBSCRIBER_COMPANY}
It will replace this text with "Subscriber's Company Name". It will return empty text if subscriber's company field is empty.
Usage:
In your newsletter edit area;
Hello {SUBSCRIBER_NAME}! Your company name: {SUBSCRIBER_COMPANY}.
In subscriber mailbox;
Hello John Doe! Your company name: Test Company.
{CURR_DATE}
It will replace this text with "Current Date".
Usage:
In your newsletter edit area;
{CURR_DATE}
In subscriber mailbox;
24.03.2015
{CURR_YEAR}
It will replace this text with "Current Year".
Usage:
In your newsletter edit area;
{CURR_YEAR}
In subscriber mailbox;
2015
{CURR_MONTH}
It will replace this text with "Current Month".
Usage:
In your newsletter edit area;
{CURR_MONTH}, {CURR_YEAR}
In subscriber mailbox;
03, 2015
{VERIFY_LINK[TEXT]}
Subscriber verification link. This code only can be used for new subscriptions. It will generated verification URL for each new registrations.
Usage:
In your newsletter edit area;
Hello {SUBSCRIBER_NAME}! Please {VERIFY_LINK[click here]} for your e-mail verification.
In subscriber mailbox;
Hello John Doe! Please click here for your e-mail verification.
{LETHE_SAVE_TREE}
This code is optional signature. You can disable this short code or change value on "Organization Settings" section.
Usage:
In your newsletter edit area;
Lorem ipsum dolor sit amet.. ... ------- {LETHE_SAVE_TREE}
In subscriber mailbox;
Lorem ipsum dolor sit amet.. ... ------- Save a Tree! Please don’t print this e-mail unless you really need to!
2 - Custom Codes
You can create your own short codes here.
Example custom code creation and usage;
New Code Field:site_name New Code Value Field:Test Web
Usage:
In your newsletter edit area;
Hello! Thank your for visit our {site_name} site!
In subscriber mailbox;
Hello! Thank your for visit our Test Web site!
Templates
Templates is ready-to-use campaign bodies for new campaign creations. If you have standart colours or your company is using same contents for every mails you can save your mail bodies for next campaigns. Templates is offers to you stylish email contents and saving time for newsletter creations.
Templates using HTML5 codes. You can easily create templates with HTML form, but you must use full URL addresses for images and inline CSS codes.
Too many mail service providers blocked external CSS files or head CSS definitions.
There two type template available;
System Templates
These templates using by system actions like thank you pages or verification mail contents etc. You can change current system template designs with your own contents.
Verification Template: Used for verification mail bodies.
Unsubscribe Template: Used for unsubscribing actions. When receiver click on your Unsubscribe link this page will appear.
Thanks Template: Used for completed verification process. When receiver click on your Verify Link this page will appear.
No Record Found Template: Global system record not found error template.
Error Occurred Template: Global system error template.
Already Verified Template: If a subscriber click the Verify Link multiple times, this page will appear.
User Templates
Templates you have created.
Important template creation notes;
If you using CSS classes or relative URLs on your mail body, you may have trouble with some mailbox clients because CSS classes, scripts, iframes, relative url paths will not work properly for all mailbox clients.
Mail body creation truths;
Use inline styles
Don't use javascript codes
Don't use iframes
Don't use flash embed codes or videos
Use full URL path for images (jpg, png or gif)
Use small size images. (take care of your hosting bandwidth)
Most clients supported css3, media tags and html5 innovations, but don't forget older client technologies too.
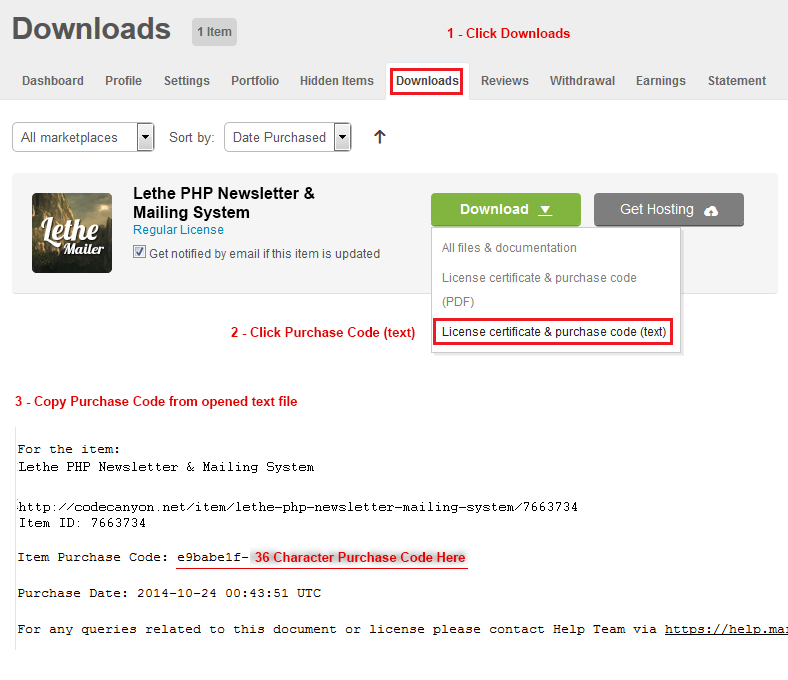
We have peridoicly update our template database, you can download our E-mail templates in "Template Loader" section. Template Loader checking our database via your "Purchase Code" its must be valid key. Key generated by Envato when you purchase item and you can enter this key on "General Settings" section.
Press the icon in the template you want to download. If you get an error while download, the following problems may have occurred.
Invalid purchase key
Our server is temporarily in maintenance
Your template limit is exceeded (Only for PRO version)
If your subscriber contact with you about undeliveried verification mails, you can send a new verification e-mail to subscriber. Also you can manually verify subscribers here.
Generate New Code button will generate new verification code for each subscribers.
Full Details
You can see all of subscriber datas here.
Stats
Subscriber statistics.
Edit Subscriber
You can change subscriber datas here.
Bulk Actions
You can apply a setting for all selected group subscribers from "Bulk Actions" section.
- Click on "Bulk Actions" button from bottom page of "Subscribers".
- Choose group(s) which subscribers want to apply new setting.
- Choose an "Action" on list.
Mark as Active: Selected Groups Will Updated as Active
Mark as Inactive: Selected Groups Will Updated as Inctive
Mark as Unverified: Selected Groups Will Updated as Unverified
Mark as Single Verified: Selected Groups Will Updated as Single Verified
Mark as Double Verified: Selected Groups Will Updated as Double Verified
Selected Actions
This actions only can be apply for selected subscribers on "Subscriber List"
- Tick on checkbox(es) for which subscriber(s) want to apply a action.
- Choose an action from listbox bottom page of "Subscribers"
Delete: Selected subscribers will remove after click on "Selected Records" button
Move to: When you choose this option, subscribers group listbox will appear right side. Selected subscribers will move to selected subscriber group on this list.
Subscriber Groups
You can easily collect your subscribers into categories.
There two type Subscriber Groups available
System Groups
These groups are created by system and cannot be removed.
Unsubscribe Group
If you choose "Move to Unsubscribe Group" rule from organization settings section, subscribers will store on this group.
Ungrouped
If you forgot to change subscription group data from "Subscriber Forms" after remove a "Subscriber Group" or when you get incorrect group attemps by API, system will add your new subscribers to Ungroupped area.
User Groups
You can create your own "Subscriber Groups" on New Group tab. Also you can delete or edit group names on Groups tab.
Group Merging;
If you want to merge your groups on "One" group;
- Click on Merge Groups tab.
- Choose a destination group, where you want to put your selected group subscribers.
- Choose source group(s) on list. (Ctrl+Left Click for multiple selection)
- Click on "Remove Sources After Merging" box, if you want to remove old groups after merging.
- Click on "Merge" button.
Subscribe Forms
Forms
You can create your subscription forms for public registrations.
Subscribe Forms has draft system, forms will not publish until you check "Publish Form" box.
Settings
General form settings, errors, alerts, redirection, target group etc..
Form Name: Subscription form name (Just identification, its not used on public area)
Success Text: Successfully registration message.
Success URL: If you want to show a url or redirect to a page after registration, you can enter a web address.
Success URL Text: If you enter a web address for Success URL field, you can show a text about link like: "Click here". Its continues after Success Text, you must use it like that;
With redirection; Success Text: Your registration successfully completed. Page will redirect in 5 second, if page is not redirected Success URL Text: Click here Output: Your registration successfully completed. Page will redirect in 5 second, if page is not redirected Click here
Without redirection; Success Text: Your registration successfully completed. Back to Success URL Text: mainpage. Output: Your registration successfully completed. Back to mainpage.
Redirection Time: Second based page redirection time after successfully registration.
Form Errors: Subscription error messages. Lethe will add these error messages automatically (English), but if you wanna use different translation, you can easily change them.
Form Error: Shown when undefined form found. Lethe will check your form availability before registration. If form is not exists on your database, this error will occur.
E-Mail Record Exists: Shown when registered e-mail found.
E-Mail Banned: Shown when blacklisted e-mail found.
Subscription is Stopped: Shown when you disable subscription via "Subscription Disabled" option.
Your E-Mail Successfully Removed: Just appear when subscriber leave your list via Add / Remove field.
Form View: Form view type.
Groups: Subscribers will insert to selected group.
Includes: Lethe using Ajax for subscribe form actions and its requires jQuery library. If you already include jQuery library on your front-end page turn off this option. Also datepicker requires JQuery UI library.
Publish Form: Its will publish your form, form no longer edit as draft.
Subscription Disabled: If you want to close subscription, you can check this option.
Form Fields
You can add unlimited form fields on your subscribe form. Click on "Add Field" button for new field.
Field Type: Form field types. Grey text means this field already used or cannot be used more than once.
Text: Classical single line text field.
Recording Area: You can store this field data on specific database column. Default: Full Data Column.
Field Label: Field's info label e.g: Your Name
Placeholder: Example value info into field. e.g: Name
Regex Pattern: If you have custom validation for this field, you can enter regex pattern here. For more information about Regex.
Required: If this field cannot be leave as empty, you can show a error output after form action.
E-Mail: E-mail field. This field is system field and can not be removed from the list.
Phone: Phone field
Recording Area: You can store this field data on specific database column. Default: Full Data Column.
Field Label: Field's info label e.g: Company Phone
Placeholder: Example value info into field. e.g: +1-111-111-1111
Regex Pattern: If you have custom validation for this field, you can enter regex pattern here. For more information about Regex.
Required: If this field cannot be leave as empty, you can show a error output after form action.
Number: Number field. Only numeric values can be entered on this field.
Recording Area: You can store this field data on specific database column. Default: Full Data Column.
Field Label: Field's info label e.g: Your Age
Placeholder: Example value info into field.
Regex Pattern: If you have custom validation for this field, you can enter regex pattern here. For more information about Regex.
Required: If this field cannot be leave as empty, you can show a error output after form action.
Date: Date field.
Recording Area: You can store this field data on specific database column. Default: Full Data Column.
Field Label: Field's info label e.g: Birthday
Placeholder: Example value info into field. e.g: MM/DD/YYYY
Regex Pattern: If you have custom validation for this field, you can enter regex pattern here. For more information about Regex.
Required: If this field cannot be leave as empty, you can show a error output after form action.
Add Datepicker: Calendar will appear when click on this field. (JQuery UI Required)
Textarea: Classical multiline text field
Recording Area: You can store this field data on specific database column. Default: Full Data Column.
Field Label: Field's info label e.g: Info
Placeholder: Example value info into field.
Regex Pattern: If you have custom validation for this field, you can enter regex pattern here. For more information about Regex.
Required: If this field cannot be leave as empty, you can show a error output after form action.
Selectbox: Drop-down list box.
Recording Area: You can store this field data on specific database column. Default: Full Data Column.
Field Label: Field's info label e.g: Town
Options: Listbox preview. You can see current list and order.
Controls: Up-Down buttons will change selected list item order and X button remove selected item from list.
New Option: If you want to add new option; Value field is get the data you want, Text field is the option label you want to see on the list.
Required: If this field cannot be leave as unselected, you can show a error output after form action.
Checkbox: Clickable small checkboxes.
Recording Area: You can store this field data on specific database column. Default: Full Data Column.
Field Label: Field's info label e.g: Favorite Sports
Options: Checkbox preview. You can see current list and order.
Controls: Up-Down buttons will change selected list item order and X button remove selected item from list.
New Option: If you want to add new option; Value field is get the data you want, Text field is the option label you want to see on the list.
Required: If this field cannot be leave as unchecked, you can show a error output after form action.
Radio Button: One selection on listed options.
Recording Area: You can store this field data on specific database column. Default: Full Data Column.
Field Label: Field's info label e.g: Favorite Sports
Options: Checkbox preview. You can see current list and order.
Controls: Up-Down buttons will change selected list item order and X button remove selected item from list.
New Option: If you want to add new option; Value field is get the data you want, Text field is the option label you want to see on the list.
Required: If this field cannot be leave as unchecked, you can show a error output after form action.
URL: Web address field.
Recording Area: You can store this field data on specific database column. Default: Full Data Column.
Field Label: Field's info label e.g: Website
Placeholder: Example value info into field.
Regex Pattern: If you have custom validation for this field, you can enter regex pattern here. For more information about Regex.
Required: If this field cannot be leave as empty, you can show a error output after form action.
reCaptcha: This field will generate texts for protect your website from spam and abuse.
Field Label: Field's info label e.g: Confirmation Code
Error Message: This value will shown when incorrect text entered on this field.
API Version: Lethe using Google reCaptcha product for spam controls. You can use any API version for form confirmations.
API V1: Older Google reCaptcha API. Simple image verification (Removed from Google)
API V2: Customized API. You can change theme, language and type. (Global keys will not work also you must set your domain to API 2 key)
Language: Google reCaptcha's supported display languages.
Type: Confirmation types, Image or Audio confirmation.
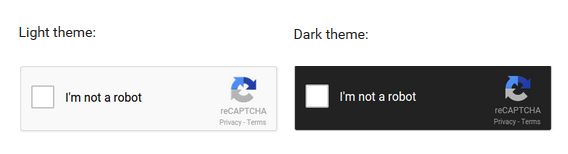
Theme: reCaptcha display theme. Could be used for lighter or darker pages.
API V3: New Google reCaptcha system. Validate requests with a scrore. More details.
Error Message: This value will shown when field leave unchecked.
Add / Remove Label: Option labels.
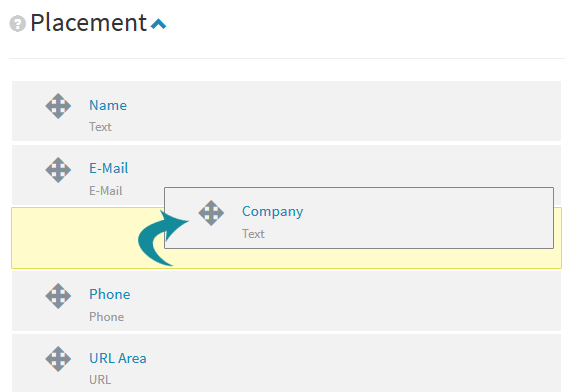
Placement
Drag-drop form field sorting. Click on "Save Placement" after sorting complete.
Embed Code
Your subscribe form embed code. After clicking "Generate Code" button, your embed code will apper on textarea, please click / copy this code and paste on your front-end page where you want to place your form. Also you can check your form view with "Preview" button.
Simple Embed Code With Line Breaks
You can modify your form style if you don't use Twitter Bootstrap.
Required Fields
lethe_form (hidden) : Subscribe Form ID created automatically and stored in form_id column. lethe_oid (hidden) : Organization Public Key. You can find key informations at Organization Settings section LetheForm_Mail (text or email) : Subscriber E-Mail field.
You can control your subscribers with API control. Thats mean you can add, move, delete or check subscriber datas from another servers.
API Action
Actions to be implemented by the called API address. All callbacks will return JSON data like {"success":false,"error":"EMAIL_EXISTS"}
You can handle errors like that;
# API URL
$api_uri = "http://www.example.com/lethe/lethe.api.php?act=remove&pkey=0a007a664bbf987aa1b2e07857bcfecc&akey=NTI3NjhiNDI3NzFkYzRmYWJjNjA0M2Rh&lmail=".$_POST['email'];
$ch = curl_init();
curl_setopt($ch,CURLOPT_URL,$api_uri);
curl_setopt($ch,CURLOPT_RETURNTRANSFER,1);
curl_setopt($ch,CURLOPT_CONNECTTIMEOUT,10);
$newsletter = curl_exec($ch);
$newsletter = json_decode($newsletter);
curl_close($ch);

# Success Output true / false
if($newsletter['success']){
	echo('E-Mail successfully removed!');
}else{
	echo('E-Mail could not be removed!');
}

# Text Outputs
if($newsletter['error']=='EMAIL_NOT_EXISTS'){
	echo('E-Mail could not be found!');
}
Add
Remote E-mail inserter. Target e-mail will be add to database if its not exists.
Return true / false
Remove
Remote E-mail remover. Target e-mail will be remove to database if its exists.
Return true / false
Check
Remote E-mail controller. Target e-mail will check the database.
Return true / false
Add to Blacklist
Remote E-mail blacklist inserter. Target mail will be add to blacklist table.
Return true / false
Move To
Remote E-mail group changer. Target E-mail will be move to destination group.
Return true / false
API Data
API requested datas. Remove, Check, Blacklist actions, just required e-mail address.
Add Action: Required group for recording destination and subscriber name (optional)
Move Action: Required group for move destination.
API Handler
When you click on reload button, API URL will appear on textarea. Please check How to Use API section.
How to Use API
PHP
Tip: Examples was created by detailed usage, you can create custom function for each cURL connections.
API Handler URL
<?php

$api_uri = "http://www.example.com/lethe/" # Your Lethe URL Path
		  ."lethe.api.php?" # API Handler File
		  ."act=add" # API action (add,remove,moveto,check,toblacklist)
		  ."&pkey=0a007a664bbf987aa1b2e07857bcfecc" # Organization Public Key
		  ."&akey=NTI3NjhiNDI3NzFkYzRmYWJjNjA0M2Rh" # Organization API Key
		  ."&lmail=[MAIL_VALUE]" # Target E-Mail Value
		  ."&lgrp=8" # Subscriber Group ID (Only for add & moveto actions)
		  ."&lsname=[SUBSCRIBER_NAME_VALUE]" # Subscriber Name Value (Only for add action)

?>
<?php

if(isset($_POST['addMember'])){

	# Field Controls
	$errors = '';
	if(!isset($_POST['username']) || empty($_POST['username'])){
		$errors .= '* Please Enter a Username<br>';
	}
	if((!isset($_POST['pass']) || empty($_POST['pass'])) && (!isset($_POST['pass2']) || empty($_POST['pass2']))){
		$errors .= '* Please Enter a Password<br>';
	}else{
		if($_POST['pass'] <> $_POST['pass2']){
			$errors .= '* Mismatch Passwords<br>';
		}
	}
	if(!isset($_POST['fullname']) || empty($_POST['fullname'])){
		$errors .= '* Please Enter a Name<br>';
	}
	if(!isset($_POST['email']) || empty($_POST['email'])){
		$errors .= '* Invalid E-Mail<br>';
	}

	if($errors==''){

		# Newsletter Control
		$newsletter = ((isset($_POST['newsletter']) && $_POST['newsletter']) ? true:false);

		if($newsletter){ # Call API If newsletter option checked
			# API URL
			$api_uri = "http://www.example.com/lethe/lethe.api.php?act=add&pkey=0a007a664bbf987aa1b2e07857bcfecc&akey=NTI3NjhiNDI3NzFkYzRmYWJjNjA0M2Rh&lmail=". $_POST['email'] ."&lgrp=8&lsname=" . $_POST['fullname'];

			# Add E-mail via API
			# $newsletter value will change true / false after successfully connection
			# If mail already registered on your Lethe its will return false, else its return true.
			$ch = curl_init();
			curl_setopt($ch,CURLOPT_URL,$api_uri);
			curl_setopt($ch,CURLOPT_RETURNTRANSFER,1);
			curl_setopt($ch,CURLOPT_CONNECTTIMEOUT,10);
			$newsletter = curl_exec($ch);
			$newsletter = json_decode($newsletter);
			curl_close($ch);
		}

		# Your Database Inserting Actions Here
		# Save newsletter option on your member table column. like; SET newsletter=". (($newsletter['success']) ? 1:0) ."
		# ....
		# ....


	}else{
		# Errors
	}

}
?>
Member Profile Subscription Controls
You can check subscription status via members newsletter column data. But may be you want to check live subscription table via API.
Member Profile Form
<?php
# Open Member Informations from Your Member Table
# $myconn is your database connection
# $ID is your logged member ID, you can store this information cookie, session or another methods

$opUsr = $myconn->query("SELECT * FROM members WHERE ID=". intval($ID) ."") or die(mysqli_error($myconn));
if(mysqli_num_rows($opUsr)==){die('* Member Could Not Be Found!');}else{
	$opUsrRs = $opUsr->fetch_assoc();

	# Subscription control from Lethe Subscribers Table
	$api_uri = "http://www.example.com/lethe/lethe.api.php?act=check&pkey=0a007a664bbf987aa1b2e07857bcfecc&akey=NTI3NjhiNDI3NzFkYzRmYWJjNjA0M2Rh&lmail=" . $opUsrRs['email'];

			# Check E-mail via API
			# $newsletter value will change true / false after successfully connection
			# If member mail found in Lethe table $newsletter value defined by true else false.
			$ch = curl_init();
			curl_setopt($ch,CURLOPT_URL,$api_uri);
			curl_setopt($ch,CURLOPT_RETURNTRANSFER,1);
			curl_setopt($ch,CURLOPT_CONNECTTIMEOUT,10);
			$newsletter = curl_exec($ch);
			$newsletter = json_decode($newsletter);
			curl_close($ch);

}
?>

<form action="register.php" name="member_form" id="member_form" method="post">
	<div class="form-group">
		<label for="username">Username</label>
		<input type="text" class="form-control" id="username" name="username" value="<?php echo(htmlspecialchars($opUsrRs['username'],ENT_COMPAT,'UTF-8'));?>">
	</div>
	<div class="form-group">
		<label for="pass">Password</label>
		<input type="password" class="form-control" id="pass" name="pass">
	</div>
	<div class="form-group">
		<label for="pass2">Re-type</label>
		<input type="password" class="form-control" id="pass2" name="pass2">
	</div>
	<div class="form-group">
		<label for="fullname">Full Name</label>
		<input type="text" class="form-control" id="fullname" name="fullname" value="<?php echo(htmlspecialchars($opUsrRs['fullname'],ENT_COMPAT,'UTF-8'));?>">
	</div>
	<div class="form-group">
		<label for="email">E-Mail</label>
		<input type="email" class="form-control" id="email" name="email" value="<?php echo(htmlspecialchars($opUsrRs['email'],ENT_COMPAT,'UTF-8'));?>">
	</div>
	<div class="form-group">
		<label for="newsletter">Do you want to join our newsletter?</label>
		<input type="checkbox" class="form-control" id="newsletter" name="newsletter" value="YES"<?php echo((($newsletter['success']) ? ' checked':''))?>>
	</div>
</form>
Profile Updates How to Remove E-Mail from Lethe Table
<?php

if(isset($_POST['updateMember'])){

	# Field Controls
	$errors = '';
	if(!isset($_POST['username']) || empty($_POST['username'])){
		$errors .= '* Please Enter a Username<br>';
	}
	if((!isset($_POST['pass']) || empty($_POST['pass'])) && (!isset($_POST['pass2']) || empty($_POST['pass2']))){
		$errors .= '* Please Enter a Password<br>';
	}else{
		if($_POST['pass'] <> $_POST['pass2']){
			$errors .= '* Mismatch Passwords<br>';
		}
	}
	if(!isset($_POST['fullname']) || empty($_POST['fullname'])){
		$errors .= '* Please Enter a Name<br>';
	}
	if(!isset($_POST['email']) || empty($_POST['email'])){
		$errors .= '* Invalid E-Mail<br>';
	}

	if($errors==''){

		# Newsletter Control
		$newsletter = ((isset($_POST['newsletter']) && $_POST['newsletter']=='YES') ? true:false);

		if(!$newsletter){ # Call API If newsletter option unchecked
			# API URL
			$api_uri = "http://www.example.com/lethe/lethe.api.php?act=remove&pkey=0a007a664bbf987aa1b2e07857bcfecc&akey=NTI3NjhiNDI3NzFkYzRmYWJjNjA0M2Rh&lmail=". $_POST['email'];

			# Remove E-mail via API
			# $newsletter value will change true / false after successfully connection
			# If mail already registered on your Lethe its will remove e-mail and $newsletter value will defined as true
			$ch = curl_init();
			curl_setopt($ch,CURLOPT_URL,$api_uri);
			curl_setopt($ch,CURLOPT_RETURNTRANSFER,1);
			curl_setopt($ch,CURLOPT_CONNECTTIMEOUT,10);
			$newsletter = curl_exec($ch);
			$newsletter = json_decode($newsletter);
			curl_close($ch);
		}else{ # If member check newsletter option, call add action
			# API URL
			$api_uri = "http://www.example.com/lethe/lethe.api.php?act=add&pkey=0a007a664bbf987aa1b2e07857bcfecc&akey=NTI3NjhiNDI3NzFkYzRmYWJjNjA0M2Rh&lmail=". $_POST['email']."&lgrp=8&lsname=".$_POST['fullname'];

			# Remove E-mail via API
			# $newsletter value will change true / false after successfully connection
			# If mail already registered on your Lethe its will remove e-mail and $newsletter value will defined as true
			$ch = curl_init();
			curl_setopt($ch,CURLOPT_URL,$api_uri);
			curl_setopt($ch,CURLOPT_RETURNTRANSFER,1);
			curl_setopt($ch,CURLOPT_CONNECTTIMEOUT,10);
			$newsletter = curl_exec($ch);
			$newsletter = json_decode($newsletter);
			curl_close($ch);
		}

		# Your Database Updating Actions Here
		# Save newsletter option on your member table column. like; SET newsletter=". (($newsletter['success']) ? 1:0) ."
		# ....
		# ....


	}else{
		# Errors
	}

}
?>
API JSON Callbacks
API result always return 2 parameter success (true / false) and error (short error tags).
Simple Result
{'success':false,'error':'INVALID_MAIL'}
You can use it like
<?php
# --- CURL CONNECTION ---

$result = $curl_result;
$result = json_decode($result,true);

if($result['success']){

    # Custom Success Output
    echo('Thank you for subscription');

}else{

    # Custom Error Output
    echo('Error Occured');

    # Or Detailed Error Output (Its could be use for all error list)
    if($result['error']=='INVALID_MAIL'){
        echo('Invalid E-Mail Address!');
    }

}
?>
API Error Results
NO_ERROR = There no error found
DEMO_MODE_ON = Demo mode on, you cannot use actions while runing demo mode.
INVALID_ORG_KEY = Invalid Organization key
INVALID_API_KEY = Invalid API key
INVALID_EMAIL = E-Mail value is not valid
INVALID_ACTION = Invalid API action
INVALID_ORG = Invalid Organization, Organization removed or incorrect ORG_KEY
INVALID_GROUP = Invalid group ID. Group Could not be found or Organization is not owner of this group.
EMAIL_IN_BLACKLIST = E-Mail already in blacklist.
EMAIL_ADDED = E-Mail added successfully
EMAIL_EXISTS = E-Mail already exists in Lethe table.
EMAIL_REMOVED = E-Mail successfully removed
EMAIL_NOT_EXISTS = E-Mail is not exists on Lethe table.
EMAIL_ADDED_TO_BLACKLIST = E-Mail successfully added to blacklist
EMAIL_MOVED = E-Mail successfully moved to selected destination group.
SUBSCRIBING_LIMIT_EXCEEDED = Subscribing Limit exceeded (Only PRO Version)
BLACKLIST_LIMIT_EXCEEDED = Blacklist Limit exceeded (Only PRO Version)
API Error List for Array Control
<?php
$api_errors = array(
					'NO_ERROR'=>'There no error found',
					'DEMO_MODE_ON'=>'Demo mode active',
					'INVALID_ORG_KEY'=>'Invalid Organization Key',
					'INVALID_API_KEY'=>'Invalid API Key',
					'INVALID_EMAIL'=>'Invalid E-mail address',
					'INVALID_ACTION'=>'Invalid action',
					'INVALID_ORG'=>'Organization could not be found',
					'INVALID_GROUP'=>'Invalid group paramerter',
					'EMAIL_IN_BLACKLIST'=>'You have banned from our system',
					'EMAIL_ADDED'=>'Thank you for subscription',
					'EMAIL_EXISTS'=>'Your E-mail already exists',
					'EMAIL_REMOVED'=>'Your E-mail has been removed from our system',
					'EMAIL_NOT_EXISTS'=>'E-mail address is not exists',
					'EMAIL_ADDED_TO_BLACKLIST'=>'E-mail address added to blacklist',
					'EMAIL_MOVED'=>'E-mail group has been changed',
					'EMAIL_ALREADY_EXISTS_IN_GROUP'=>'E-mail already exists on destination group',
					'SUBSCRIBING_LIMIT_EXCEEDED'=>'Subscription closed',
					'BLACKLIST_LIMIT_EXCEEDED'=>'E-mail could not be add to blacklist',
					);
?>
Example API Error From Customizable Array Value
<?php
$result = json_decode($curl_result,true);

if(array_key_exists('success',$result) && $result['success']==true){
	# Success Result
	if(array_key_exists($result['error'],$api_errors)){
		echo($api_errors[$result['error']]);
	}else{
		# If key not exists
		echo('Registration Completed');
	}
}
else if(array_key_exists('error',$result)){
	# Error Result
	echo($api_errors[$result['error']]);
}else{
	# System Error
	echo('Connection Error!');
}
?>
Your visitors can sign up your mail list via custom subscribe forms. You can check detailed informations about Subscribe Forms here.
2 - API
You can add new subscribers via custom membership forms with API calls. You can check detailed informations about Subscribe Forms here.
3 - Lethe Admin
You can manually add new subscribers on Subscribers > Add Subscriber section. You can choose created subscribe forms on list or you can use system form for subscriber registration.
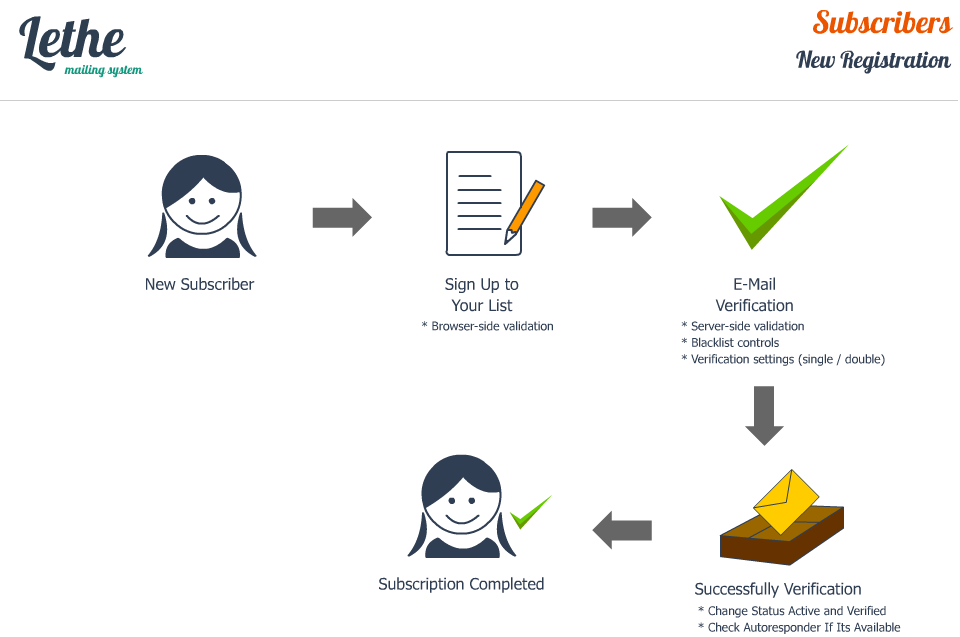
Subscriber Registration Steps
Verification
When a guest add a e-mail address to your list, system will send a verification mail to guest's e-mail. Verification mode can be modified from the "Organization Settings" section.
Off
E-Mail will record to database without verification.
Single-opt-in
E-Mail will record to database but its will marked as inactive. After registration; system will send a verification e-mail to subscriber's e-mail address. If subscriber click on verification link, e-mail record will mark active.
Double-opt-in
E-Mail will record to database but its will marked as inactive. After registration; system will send a verification e-mail to subscriber's e-mail address. If subscriber click on verification link, e-mail record will mark single-active and system will send verification e-mail again. E-mail record will mark as double-active when subscriber click on second verification link.
Unsubscribing
Unsubscribing actions requires a rule about what to do.
There 3 rule available for unsubscribers. You can set this rule at the Organization Settings section.
Mark it inactive
Remove from database
Move to unsubscribe group
Mark it inactive;
When a subscriber click on your Unsubscribe Link, subscriber record will mark as inactive subscriber. This is associated with the subscriber loader portion.
Remove from database;
When a subscriber click on your Unsubscribe Link, subscriber record will removed from your database.
Move to unsubscribe group;
When a subscriber click on your Unsubscribe Link, subscriber record will not removed from database, but its not load to campaign task list anymore, until you move it to another group.
Blacklist
You can block some guest for subscribing to your list. Blacklisted e-mails and IP address cannot be add any e-mail address to your list.
How to mark a visitor as blacklisted?
Manual Entries
From API
From Bounces
1 - Manual Entries
You can add a blacklist record from Subscribers > Blacklist section.
E-Mail address: Blocked e-mail address
IP Address: Blocked IP address
Reason: Why this record added to blacklist info.
2 - From API
You can call toblacklist action via API. Please check How to Use API section for API usage.
3 - From Bounces
When bounced mail found via bounce handler, this record could be added to blacklist table. You can set bounce rules for that. Bounce handler automatically add new blacklist records. Please check Bounce Rules for detailed informations.
Import / Export
You can export all subscribers to txt / csv file, also you can import your existed list to your Lethe platform.
Exporting
Groups: Only selected group subscribers will export. (Ctrl + Left click for multiple selection)
Export Model: Export file body type. If you choose <mail@gmail.com> model, your datas will exported as this style.
Separator: Exported record splitter. If you choose (,) comma, your records will separated by comma like <mail1@gmail.com>,<mail2@gmail.com>
Subscriber Status: Only selected status will export. All / Active / Inactive
Verification Status: Only selected status will export. All / Single or Double Verified
Save as CSV: New feature on Lethe v2.2. You can export of your subscriber datas to CSV file with your selected subscriber data fields.
Importing
IMPORTANT: Progress bar only count successfully records. If your progress bar does not reach to %100 thats mean there invalid, already registered or blacklisted mail found. You will see green "Success" text after all emails controlled and saved.
Import File
Classical file importing action. Only txt and csv file can be use for import action.
Groups: Imported records will save on selected group.
Import Model: Imported file body type. You must choose correct model with your file.
Separator: Imported file record separator. You must choose correct separator with your file.
as Marked: New subscribers will mark as selected status. Active / Inactive
Verification Status: New subscribers will mark as selected verification status. Unverified / Single or Double Verified.
File: Choose your txt / csv file from your computer.
You will see detailed informations about your importing progress after click "Import" button. Do not close / reload page until import action complete.
Import From Third Party Software
Remote or Local Database importing action.
Groups: Imported records will save on selected group.
Import Model: Imported file body type. You must choose correct model with your file.
as Marked: New subscribers will mark as selected status. Active / Inactive
Verification Status: New subscribers will mark as selected verification status. Unverified / Single or Double Verified.
Database Connection: Enter your remote / local database connection informations and click "Test Connection". Next step will appear after successfully connection.
Table Selection: Choose your remote / local database table type on "Platform" list, enter table prefix if you use and click "Test Tables" button. Next step will appear after successfully connect to table.
Import: Click on "Import" button.
You will see detailed informations about your importing progress after click "Import" button. Do not close / reload page until import action complete.
CSV Analyser
You can import CSV files without CSV Analyser, but you may want to choose fields where do you want to save them. CSV Analyser is a best tool for multiple field import actions. You no need to import model for CSV importing. Just drag-drop CSV fields into your subscriber table columns.
Autoresponder
An autoresponder is just a sequence of email marketing messages that gets sent to subscribers in the order and frequency that you decide.
Submission Account: Your campaigns will send this account. You can check Submission Accounts section for detailed informations.
Groups: Your campaign will send only selected group subscribers.
Launch Date: Lethe will start to send your campaigns at your selected launch date.
Subject: Your main campaign subject.
Templates: Ready-to-use templates. You can choose saved templates here. Please check Templates for detailed informations.
Short Codes: Dynamic text values for your campaigns. Please check Short Codes for detailed informations.
Details: Your main campaign body. You can use inline css and html5 codes.
Alternative Content: If receiver's e-mail client doesn't support HTML messages, altenative content will shown their mailbox. Also submission account is setted by Text/Plain sending this value will use.
Attachments: If you wanna add a file for your campaings, you can use LeUpload for attachments.
Web View: If the recipient does not see your messages, you can use web option. {NEWSLETTER_LINK[TEXT]} short code required.
Preview: You can see your mail body before send.
Test: You can send a test mail to your saved "Test Mail" address. You will see how it appears in the mail box.
What is "Reset" and How Does It Work?
Reset option will appear when you edit a campaign. If you want to reset all reports and tasks please "turn on" this option before save campaign. Also if you want to send it again, you must "turn on" "Run" option.
Autoresponder Creation
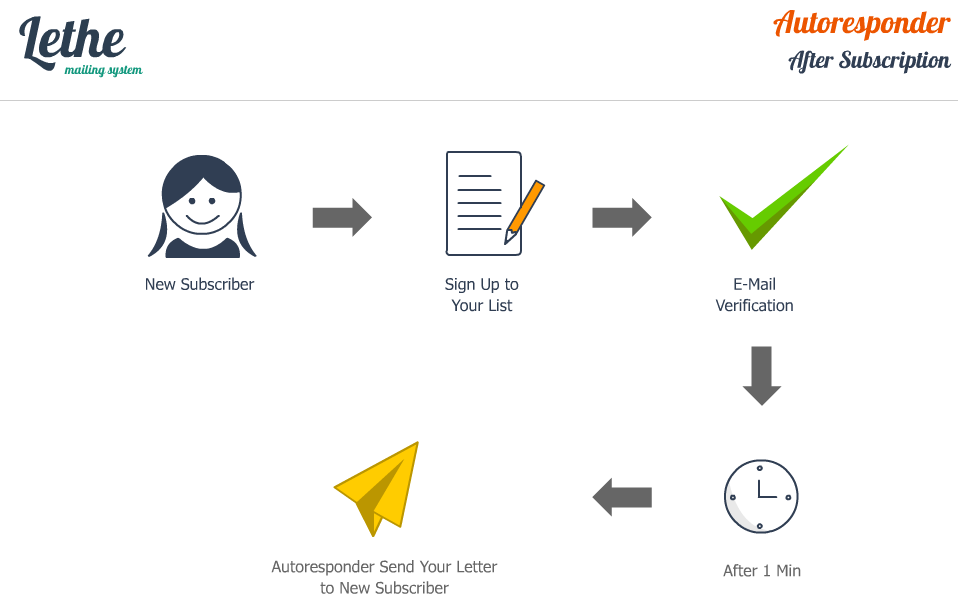
After Subscribing
After subscription action will send a message to your new subscribers. Thats could be a thank you or a welcome message. Action must be set time cycle. After x minute, hour or day etc.
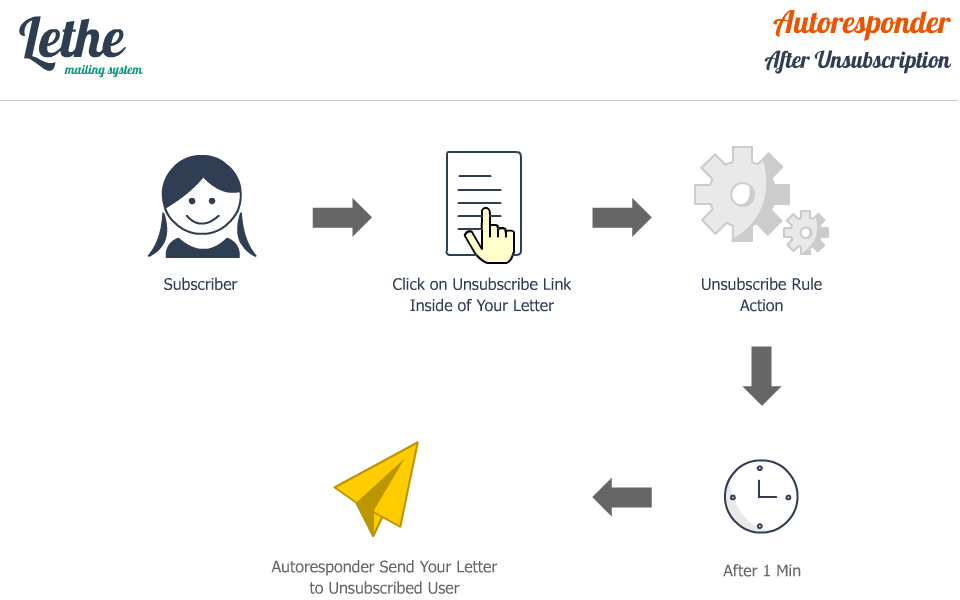
After Unsubscribing
After unsubscription action will send a message to your unsubscribers. Thats could be a goodbye or a simple survey about why did you leave etc.. Action must be set time cycle. After x minute, hour or day etc.
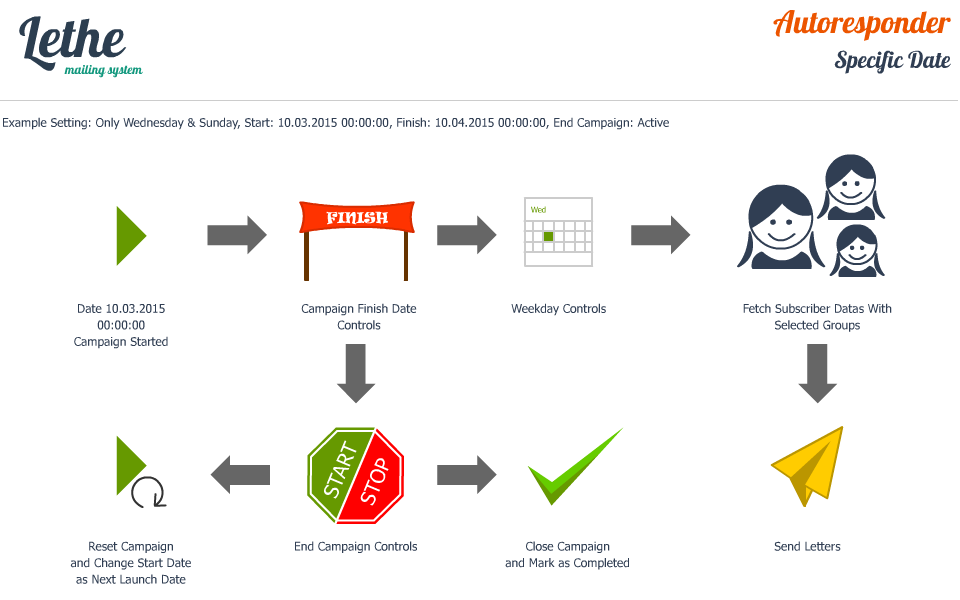
Specific Date
Specific date action will send mails between your dates.
Start date - Autoresponder start date as your autoresponder launch date. End Date - Your last campaign date End Campaign - Autoresponder will reset its own settings when its reach to end date and its will start again, if you check End Campaign box, autoresponder will close after End Date. Its will don't send mails anymore after End Date reach. Next Launch Time If you dont check End Campaign option, autoresponder will set a new start date after Campaign End Date is reach.
For example:
Start Date: 01.02.2015 00:00:00 End Date: 01.03.2015 00:00:00 Next Launch Time: After 1 Hour
When date is reach to your End Date: 01.03.2015 00:00:00 new autoresponder will start at the 01.03.2015 01:00:00
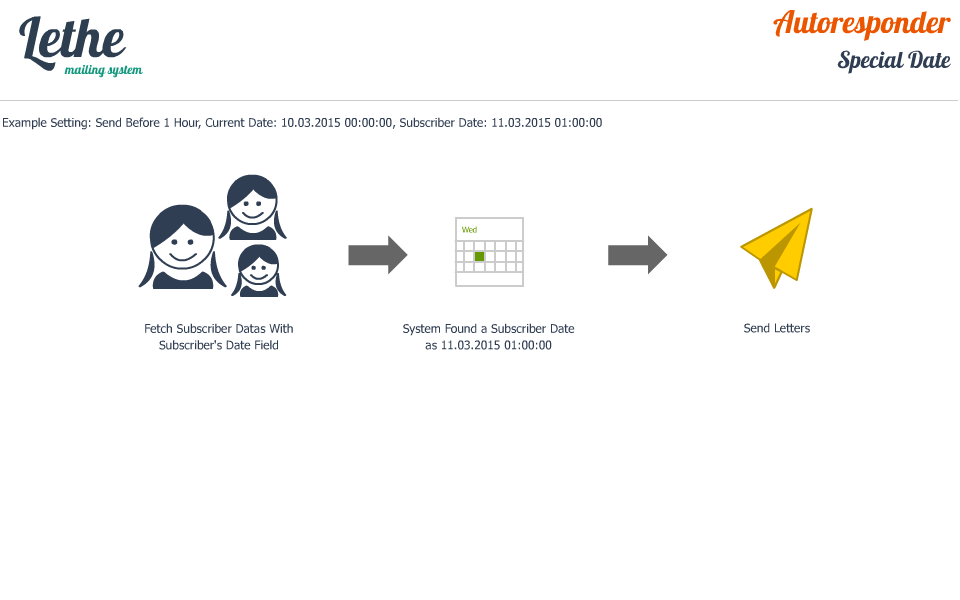
Special Date
This action uses your subscriber's date field. Its could be used as a birthday, or registration anniversary celebration etc. Subscriber date field must be filled by valid date for that.
Newsletter
With Lethe you can create a series of timely messages to announce your holiday plans, remind people about important dates and deadlines, and thank people for shopping small during the holiday season.
You can connect with potential customers across their different devices, and reach them in the place they are going every day — the inbox.
General Features
Submission Account: Your campaigns will send this account. You can check Submission Accounts section for detailed informations.
Groups: Your campaign will send only selected group subscribers.
Launch Date: Lethe will start to send your campaigns at your selected launch date.
Subject: Your main campaign subject.
Templates: Ready-to-use templates. You can choose saved templates here. Please check Templates for detailed informations.
Short Codes: Dynamic text values for your campaigns. Please check Short Codes for detailed informations.
Details: Your main campaign body. You can use inline css and html5 codes.
Alternative Content: If receiver's e-mail client doesn't support HTML messages, altenative content will shown their mailbox. Also submission account is setted by Text/Plain sending this value will use.
Attachments: If you wanna add a file for your campaings, you can use LeUpload for attachments.
Web View: If the recipient does not see your messages, you can use web option. {NEWSLETTER_LINK[TEXT]} short code required.
Preview: You can see your mail body before send.
Test: You can send a test mail to your saved "Test Mail" address. You will see how it appears in the mail box.
What is "Reset" and How Does It Work?
Reset option will appear when you edit a campaign. If you want to reset all reports and tasks please "turn on" this option before save campaign. Also if you want to send it again, you must "turn on" "Run" option.
New Campaign Creation
Tasks and Cronjobs
Newsletter, Autoresponder and Bounce Handler required Cronjob (Linux) for run task files automatically.
Lethe supported two-way to run task files via cronjob.
2- Manual created cronjobs with hosting panel area.
1 - shell_exec Cronjob Creation
Default Lethe system using shell_exec method. It better for system performance, because each campaigns will work by IDs and their own instance.
There 3 task file available for automated cronjobs;
chronos/lethe.php
Main cronjob controller file. This file checking daily limits, new tasks and new submission account to create / delete cronjob tasks.
chronos/lethe.tasks.php
Newsletter and Autoresponder file. This file requires campaign IDs to run campaign routines and submissions.
chronos/lethe.bounce.php
Bounce mail controller file. This file requires submission account IDs to connect IMAP/POP3 server to check bounced mails.
shell_exec only works for Linux servers. If your server working on Windows server then you should be use Task Manager and Manual Cronjob task files.
FAQ for shell_exec
My shell_exec enabled on my server but cronjobs cannot be created automatically.
There may be many reasons for this. Some hosting services using different cronjob paths. We have used common cronjob commands. You can check it on General Settings / Cron tab. Enable shell_exec option and test your commands. You will test results left column.
In addition; cron commands using WGET, CURL and LYNX. These extensions may be disabled on your server.
2 - Manual Cronjob Creation
There 4 task file available for manual cronjobs;
chronos/lethe.php
Main cronjob controller file. This file checking daily limits, new tasks and new submission account to create / delete cronjob tasks.
chronos/lethe.tasks.single.php
Newsletter file. This file will run newsletter campaign routines and submissions.
chronos/lethe.tasks.ar.single.php
Autoresponder file. This file will run autoresponder campaign routines and submissions.
chronos/lethe.bounce.single.php
Bounce mail controller file. This file will connect to IMAP/POP3 servers to check bounced mails.
FAQ for manual cronjobs
What are the disadvantages for Manual Cronjobs?.
Single cronjob files working on single instance. All campaigns will executed by their orders. If you have large amount subscribers and too many campaigns it will take long time to execute tasks. Like;
Task file start to sending to Campaign 1. Campaign 2 waiting for submission until Campaign 1 successfully completed. Your Send per Connection and Cronjob time will affect this time and delays.
LeUpload
LeUpload is simple file management system created for Lethe. You can easily upload and link files to your campaigns. Please watch video below, how to use LeUpload for linking.
Reports
You can check campaign activities with Detailed Reports and Productivity Analysis.
Detailed Reports
You can get detailed activity reports for each campaign. Please click on icon below campaign title.
Months: Click on month names (Ctrl+Left click or Hold Left Click+Draw followed months for multiple-selection) Year: Choose a year on listbox Report Type: All (All reports), Clicks (Only clicks), Bounces (Only bounces), Opens (Only opened mails)
Tip: If you choose single month, system will show daily reports.
Subscriber-specific details: You can see who click / open your campaigns with date, IP and extra informations. If the campaign contains more than one link, you can see which link clicked on Extra Info area.
Productivity Analysis
Productivity and Quality Analysis is calculate score for your maillist and campaigns. All stats calculated by clicked campaign data not global.
Submission Pie Data: Sent / Unsent mails for campaign. Deliveries Pie Data: Currently sent mail report. (Clicks, Opens, Bounces, Unsubscribes from sent mails) Clicks Graph: Monthly click report. For example; You've get X clicks in April (Only works if you use track_link in your campaign) Score Percent: Total Positive / Negative point. Sent Percent: Sent mail percentage (Based total subscriber count for each campaign). Unsent Percent: Unsent mail percentage (Based total subscriber count for each campaign). Click Percent: Clicked link percentage. (Requires track_link) Open Percent: Opened mail percentage from sent mails. Unsubscribe Percent: Unsubscribing percentage. (Uses unsubscribe table not Unsubscribe Group) Bounce Percent: Bounced mail percentage from campaign. Losses: Calculated by Bounces / Unsubscribes List Quality: Calculated by Bounces Campaign Quality: Calculated by Unsubscribes. (Thats mean Subscribers don't like your campaign)
Understanding Regex
Regular expressions provide a powerful, concise, and flexible means for matching strings of text, such as particular characters, words, or patterns of characters.
Lethe allows to you check the user’s inputs and to match the input values against a regular expression. Lethe subscribe forms using HTML5 technology and its supported browser-side Regex validations before send forms.
$SLNG_LIST['it'] : Language key (en,fr,de etc..) 'skey'=>'it' : Language key (en,fr,de etc..) 'sname'=>'Italiano' : Language name (English, Türkçe, Norsk etc..) 'sfolder'=>'italian' : Language folder (folder name duplicated / renamed folder as you copy English folder above) 'slocale'=>'it_IT' : Language localization (en_US, en_GB etc..) 'scharset'=>'utf-8' : Language character set (default: utf-8) 'stimezone'=>'UTC' : Language timezone (default: UTC - Server timezone)
Remove Language
If you don't want to see other languages on language list you can undefine languages in admin/language/sirius_conf.php file.
Lethe requires shell_exec for crontab modifications. All campaings and submission accounts has crontasks and these tasks created / updated automatically when you create new campaign or reset old campaigns.
There 3 cron file available and files stored in /lethe/chronos directory.
1- lethe.php
Main cron trigger file. This file automatically created on first installation. Main cron files most important for other cron add / remove routines.
2- lethe.bounce.php
Submission account's bounce mail controller. This file automatically created on new submission account registration. Your Cron periodicly will check your mailbox.
3- lethe.tasks.php
Main newsletter & autoresponder submission file. This file automatically created on campaign launch date.
How to Change User Password via phpMyAdmin?
If you lose your password and you cannot use your email address for Password Reminder, you can change your password via phpMyAdmin.
1- Open phpMyAdmin via your hosting panel
2- Find your Lethe user table and click on (eg.lethe_users)
3- Find your user on list and click on Edit link.
4- Please replace pass field with d5ae6189ae9cce9335a4c7ca89003c78
5- Click on Save Button
6- Your password successfully changed as lethe you can change it again after logged in your Lethe panel.
Language Editor
Lethe using multi Language system and its contain 25 language. We have using mass translation system for our script and its contain wrong translations indeed.
You can easily edit your main language files in General Settings > Language Editor area.
Click on Language Flags, language sections will appear left column like Front-End / Back End. You can choose sections on this column Global Keys, Newsletter or Autoresponder etc. and you will see key forms right column.
Main keyword will shown top of the text boxes. You can change form content with your translation.
When you complete of your translation you can update language files by clicking Update button.
You can share of your translation files with us, we will update our files with your names.
FAQ
1 - My System Does Not Meet With Lethe's System Requirements
Lethe requires all listed requirements for properly script usage. You may get errors when your system does not meet with Lethe's requirements. But too many hosting services allow to change some functions in their hosting panels.
2 - How to Change My PHP Version?
If you have hosting control panel like CPanel you can easily change your current PHP version.
* Log in your CPanel* Click the PHP Configuration button in the Software/Services section. * Select the version of PHP you want to use from the dropdown * Click the Update button to save your php configuration. * Check your changes by viewing your settings in a phpinfo page.
If you do not use CPanel, you can contact with your hosting service provider.
3 - How to Enable MySQLi Engine?
In CPanel;
* Log in your CPanel* Click the PHP Configuration button in the Software/Services section. * Select the mysqli option in list * Click the Update button to save your php configuration. * Check your changes by viewing your settings in a phpinfo page.
To install mysqli using EachApache:
1. Login to WHM as 'root' user.
2. Either search for "EasyApache" or go to Software > EasyApache
3. Scroll down and select a build option (Previously Saved Config)
4. Click Start "Start customizing based on profile"
5. Select the version of Apache and click "Next Step".
6. Select the version of PHP and click "Next Step".
7. Chose additional options within the "Short Options List"
8. Select "Exhaustive Options List" and look for "MySQL Improved extension"
9. Click "Save and Build"
4 - How to Change Script Timeout Limit?
Lethe already using unlimited time for Script Execute Time. But some hosting services does not allow to change this setting. You must contact with hosting service provider.
5 - How to Enable Curl Extension?
You should be enable Curl in server php.ini file. Shared hostings does not allow to edit server php.ini file and new package installations. You must contact with your hosting service provider.
6 - How to Enable Shell Access?
Shell Access modifications required server admin permission. You must contact with your hosting service provider.
7 - How to Handle Writable Files / Folders?
All writable files / folders requires 0755 or 0777 CHMOD setting. You can change settings in your FTP client or web based file manager.
Writable file lists;
lethe/resources
lethe/lib/lethe.sets.php
lethe/lib/lethe.config.php
lethe/admin/language
lethe/lib/lethe.bounces.php
8 - How to Enable IMAP Open Extension?
In CPanel;
* Log in your CPanel* Click the PHP Configuration button in the Software/Services section. * Select the imap option in list * Click the Update button to save your php configuration. * Check your changes by viewing your settings in a phpinfo page.
9 - Why I Must Be Set Sender Title and Reply Mail 3 Times?
You have 3 option for submission account customization.
In Submission Account Section
Main submission account manage area. All settings will be used for default settings, also system messages will use this settings.
In Organization Settings
Main organization submission account manage area. Organizations can use multiple submission account on their campaigns. These sender title, test mail, reply to settings will used for default organization settings. Verification mails will use these configurations.
In Campaign Area
Each campaigns can use different reply or sender title. For example; A Campaign: Sender Title Company 1, B Campaign: Sender Title Company 2 etc..
10 - What is The Organizations? Why I Must Enter Same Settings Both Sections?
Lethe working as a multi-organization system. Organization settings used for account-specific and General Settings used for global system settings. Multi-organization part just available for Lethe PRO. Lite version (Codecanyon) using single-organization.
11 - Dashboard Donugth Stats is Not Work Properly!
Dashboard stats calculated by global campaigns and subscriber datas. Its using different score formula for global reports. You can check campaign reports for each campaign report pages.
12 - Template Loader Does Not Work!
Template Loader required Envato License Key, please check your key before. Also sometimes template feed could be down cause of server status. You can try again later.
13 - Subscribing Forms Does Not Work! Also I've Seen $ required Error on Browser Debug Console.
Subscribing Forms requires JQuery. If your front-end page does not contain JQuery link, you can turn on "Include JQuery" option in form creator.
14 - Datepicker Does Not Work on Subscribing Date Field!
Subscribing form date fields requires JQuery UI. If your front-end page does not contain JQuery UI link, you can turn on "Include JQuery UI" option in form creator.
15 - Password Recovery System Gives Error!
Password recovery system has been changed on v.2.2. In previous version was used system submission account to send mails with SMTP. However, some users could not to use password recovery system, because they forgot the password after the new installations.
We have changed default system submission account SMTP to mail() function for first installation.
The issue that needs attention; Because some hosting services disabled mail() function for shared servers. If you already set of your SMTP account and want use SMTP for password recovery system, you can follow below steps to enable SMTP.